This royal icing recipe for sugar cookies, made with meringue powder, offers ease of use, quick drying, and delightful flavor. Ideal for both edging and flooding sugar cookies.
Are you ready to make royal icing and learn how to decorate sugar cookies like a pro?
I hope so! You can totally master this because I’ve got you covered with everything you need to know!
Also, if you need a recipe for sugar cookies, this is the one to use!

Royal Icing Ingredients
- Powdered sugar
- Meringue powder (powdered egg whites) – This is a dry mixture of egg whites and small amounts of sugar, cornstarch and stabilizers. Some recipes use egg whites but I have found meringue powder provides a more reliable consistency and dries better.
- Water
- Gel Colorant
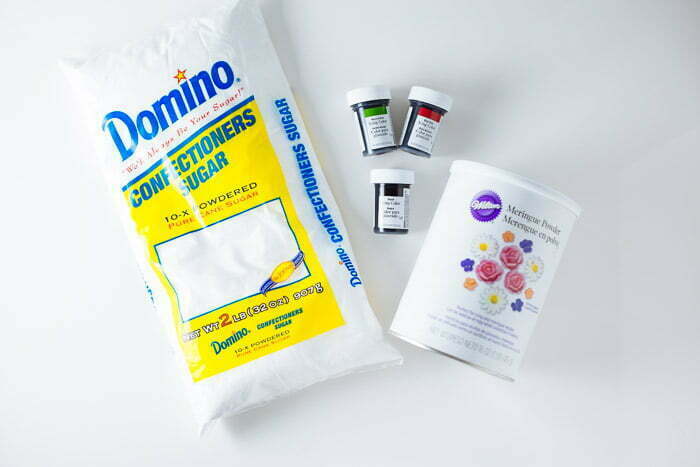
Where to Buy Royal Icing Ingredients
Gel colorant and meringue powder? A little less run-of-the-mill but can be easy to find if you know where to look. I like to buy mine from either Michael’s or Sur La Table as they sell both, have a wide selection of gel colors and are relatively inexpensive. If you don’t live near either of those retailers, here is a link for meringue powder, and another link for gel colorant🙂
Skip to the Royal Icing recipe card below for a complete ingredients list with measurements.
How to Make Royal Icing
Now that we’ve covered the ingredients, let’s get started on making Royal Icing.
- In a large bowl, add the powdered sugar, meringue powder and water.
- Mix on low speed with a hand mixer until smooth.
- Do the 15 second test to make sure the icing consistency is just right (see post above for instructions).
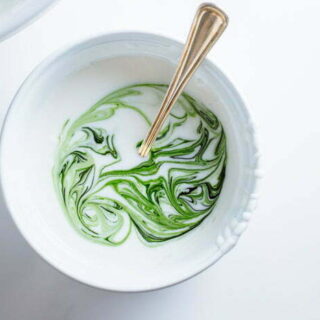
15-second Royal Icing Consistency
The”15 second test” as I like to call confirms if the royal icing is at the right consistency. This is known as flood consistency and there is also 5, 10, 15 or 20, 25 seconds icing, where 5 seconds is a very runny consistency and 25 seconds is a very thick consistency. Depending on your project you may want a different consistency.
A 15-second consistency is generally the best consistency for sugar cookies which is why it’s recommended here.
How to test royal icing for the right flood consistency:
Drag a butterknife or spatula through the icing and using your phone’s stopwatch, a watch or smart home assistant, time how many seconds it takes for the icing to blend back together and disappear.
How to adjust royal icing consistency:
Luckily, at this stage, royal icing is pretty flexible and easy adjustments can easily be made.
- 15 seconds exactly: If the icing blends back together in 15 seconds the consistency is just right.
- Under 15 seconds: If the icing blends back together in under 15 seconds the consistency is too runny. Add a teaspoon and up to 1 tablespoon of sifted powdered sugar, mix and test again. Repeat as necessary.
- Over 15 seconds: If the icing blends back together in over 15 seconds the consistency is too thick. Add a teaspoon and up to 1 tablespoon of water, mix and test again. Repeat as necessary.
The closer you are to 15 seconds, the less powdered sugar or water you should add.
Test: To confirm the right consistency for your project, try testing out what you’re doing on a plate, and wait a few minutes to see if the results are successful.
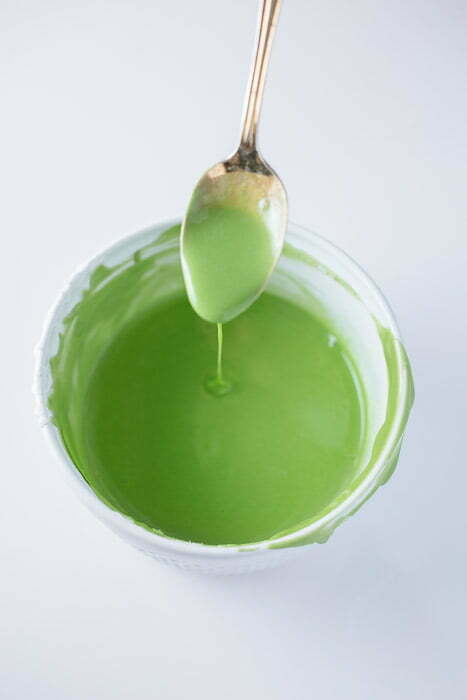
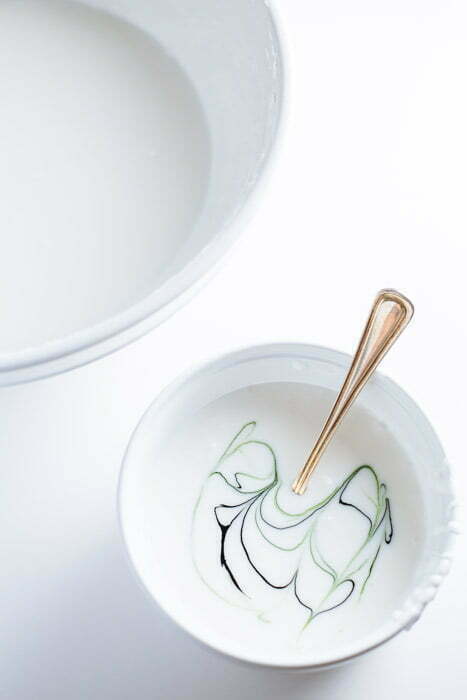
Coloring Royal Icing
Now we get to the fun part! Adding the color! For this batch, I chose to use a Moss Green color but you can use whatever color you like.
- Before adding any, split the royal icing according to how many different colors of royal icing you plan on making. You may even want a small test batch or batches if you plan to experiment with colors.
- Next, dip a toothpick into the color gel and swirl it into the white royal icing base, then mix thoroughly with a spoon.
- Continue adding colorant, one toothpick-full at a time, until you achieve the desired color.
How to Flood Cookies with Royal Icing
Equipment Needed
In addition to the cookies, royal icing and food gel colors, you’ll need these items:
- Piping bags – Disposable or reusable work.
- Coupler – Allows to switch between tips with the same icing color or use multiple icing colors with the same tip.
- Piping tips or a squeeze bottle – If you’re going to pick just one all-purpose piping tip go with a round #4 piping tip. A #1 or #2 tip are good to have for creating borders as they have smaller tips that allow for more detail.
- Toothpick or pin – To pop air bubbles when flooding.
Edging & Flooding Sugar Cookies
Now that you have your icing colors, it’s time to edge and flood the cookies. In case those terms means nothing to you, edging basically means putting a barrier around the cookie to hold the icing in place so when you’re flooding the interior with icing it doesn’t run off the edges.
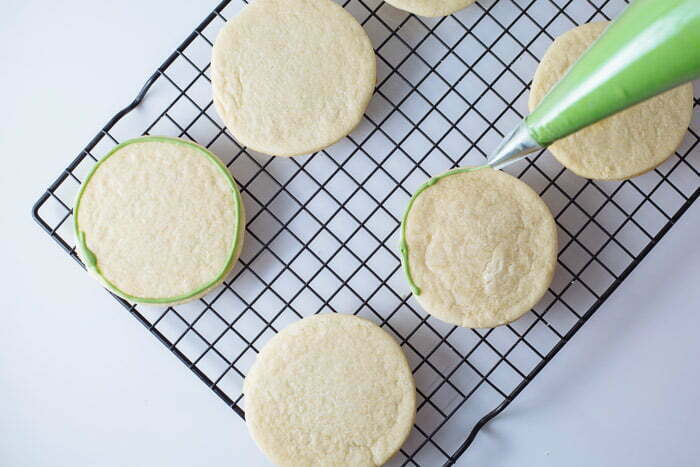
- To get an even cleaner edge around the cookies, you may want two different consistencies of icing for the edging ( thicker) and the filling (thinner). I like to put about half of each color into a piping bag (with a small tip) then reserve the rest to fill in the cookie (be sure to cover with saran wrap while you edge the cookies so your icing doesn’t dry out).
- Draw an outline around the area to edge, grab the piping bag firmly, keeping an even pressure, and touch the tip to the cookie then gently pull up and drag the line of icing around the cookie. I know it sounds weird but it works! And if you mess up, simply scrape off with a toothpick and start again.
- Allow a few minutes for the edges to dry before flooding.
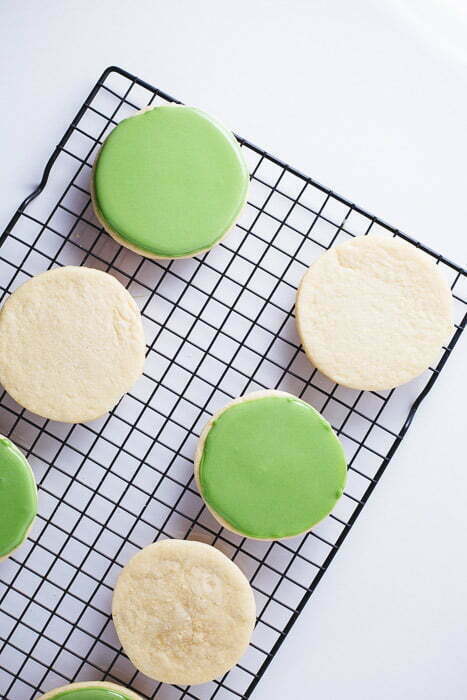
- Next, take the reserved icing of the same shade and add 1/2 teaspoon of water and stir. The consistency of the flooding icing should be around 8-10 seconds.
- Once ready, simply take a small spoon and place a blob in the middle of the cookie and tilt the cookie back and forth to fill in. To eliminate any air bubbles, you can either shake the cookie back and forth or, use a toothpick to pop the bubbles (both methods need to be done immediately before the icing hardens).
And now you have gorgeously iced cookies! The awesome thing about royal icing is that when it dries you can stack them together without any damage to your beautiful art work! And for those who think it tastes bad? You haven’t tried these!
Tip: If you want to do Royal Icing with kids or large groups, I suggest putting the icing into squeeze bottles with small tips. They’re easy to clean up and a bit more manageable if you’re not doing intricate designs).
Tips & Variations
Use a large bowl for the Icing – Be sure to use a large bowl even if you don’t think you need it. The sugar powder can spray when mixed.
Sift the powdered sugar – If the powdered sugar is clumpy, sift it before mixing.
Use clear vanilla extract – If you’re a perfectionist use clear vanilla extra to avoid adding a hint of tinting to the icing.
Royal Icing Recipe for Sugar Cookies + Edging & Flooding Tips
This royal icing recipe for sugar cookies, made with meringue powder, offers ease of use, quick drying, and delightful flavor. Ideal for both edging and flooding sugar cookies.
Ingredients
- 2 lbs powdered sugar
- 1/2 cup meringue powder
- 3/4 cup water
- Gel colorant of your choice
Instructions
- In a large bowl, add the powdered sugar, meringue powder and water.
- Mix on low speed with a hand mixer until smooth and no clumps remain.
- Do the 15-second icing consistency test to make sure the consistency is just right (see post above for instructions).
Notes
This is the homemade sugar cookie recipe to use!